
![]()
![]()
![]()
![]()
![]()
![]()
![]()
![]()
![]()
![]()
![]()
![]()
![]()
![]()
![]()
Editing Module Sections (scroll down through page for screen shots and step by step directions)
Editing Module Sections:
The Laulima Module Tool allows instructors to create individual learning paths (modules/units) based on course content. Each module added to the Modules Tool contains sections which are individual pages that form the module, much like a book that has many chapters and each chapter contains various pages. In a module student can access module sections using the Table of Contents or selecting a "Next" link.
Faculty who work with the Module Tool have a variety of choices when inserting module sections. At this time (12/07/2007) some of these choices lend themselves for faster/easier editing of section content than others. This tutorial describes one method for adding sections to a module that will allow for fast, online editing when needed.
1. Log into Laulima (https://laulima.hawaii.edu), select a course in which you are building a module (if you have yet to add the Module Tool to a course select Site Info in the course menu, click on the text link in the menu bar for "Edit Tools", check the box for Modules, click the Continue button, then Finish.
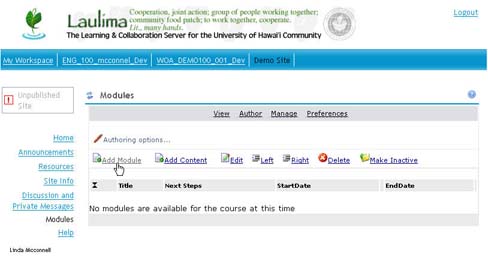
To add a module to the Module Tool, click on the Modules in the Course Menu, then choose the text link for "Add Module" in the menu bar
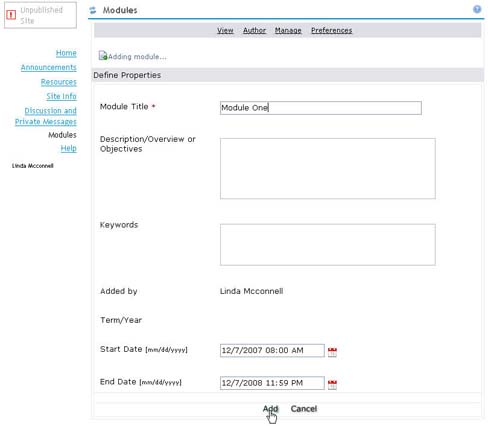
2. Enter a title and click "Add"
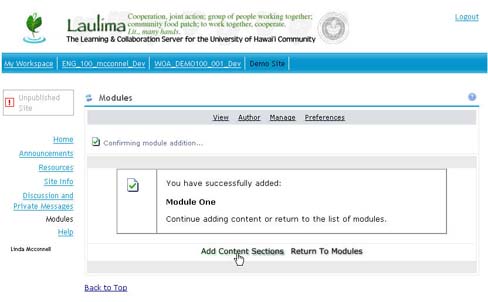
3. To add a section to the module click on the text link for "Add Content Sections"
4. Enter a section title and use the pull down menu for "Content Type"

5. As you can see one can choose a variety of ways to add content to the module, but choosing the option for "Compose content with editor" provides for the fastest, online editing of text (if choosing to "upload or link to a file" when adding a section, one would have to edit the original file first, then come back and choose to upload the file again to overwrite existing content - a bit time consuming)

6. Selecting the option for composing content with the editor will allow you to either create the section directly online or copy and paste from either a Word document or even a web page.

7. IF you already have content written in Word Open your Word file on your local computer, select all the text and choose to "Copy" (File, choose Select All, go to the Edit menu and choose "Copy).

8. Back in Laulima, select the icon that looks like a clip board with the word logo (W) on it.

9. Select the paste in the box (control key + v key) and click OK

10. Scroll to the bottom and click "Add"

11. To edit this file in the future, select the checkbox next to the module section you want to edit, using the menu bar click on the text link for Edit

12. You will now be able to return to the editor to add new text or edit old information, click "Save" when done

Return to Main Tutorial Menu