
![]()
![]()
![]()
![]()
![]()
![]()
![]()
![]()
![]()
![]()
![]()
![]()
![]()
![]()
![]()
![]()
![]()
Downloading & Exporting the Student Database (either scroll down through page or select from one of the following choices)
About Downloading & Exporting the Database
Downloading Student Database
Adding New Columns via Excel
Importing Database
Download the Text Based Version
About Downloading & Importing the Student Database:
Faculty may find a need to import/export to the Student Database when assignments are taking place outside of WebCT, used complicated formulas that are better done within a spreadsheet program or already have an existing gradebook in Excel.
NOTE: prior to working with the Student Database ALWAYS create a backup (Control Panel - Manage Course, select "Create Backup")!
Downloading Student Database:
It is best to export the existing course student database first, then build upon that structure. To download log into the Course and select "Control Panel".

Select "Manage Course".

Select "Manage Students".

Under the header for "Options: Records", use the pull down menu and select "Download" and click "Go".

Choose for the separator"Tab" and click "Download".

Select to "Save to disk", and choose a location on the desktop to save the file.

Adding new Columns via Excel:
Open a spreadsheet program, in this case Excel, go to "File" and choose "Open".

Locate the downloaded file and select to open. Proceed through the wizard, confirming "Delimited" is selected and click "Next".

Confirm "Tab" is selected and click "Next".

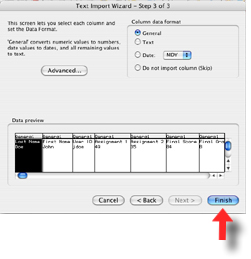
Click "Finish".
Proceed to add additional columns and scores for students (if needed). When done, go to File, select "Save" to overwrite existing file.

Importing Database:
Log back in the Course, go to "Control Panel", "Manage Course" and select "Add/import students".

Under the header for "Import From File" select the "Browse" button.

To upload the file, click "Browse" again.

Locate the file on the desktop, click once to select, click "Open" and select "Upload".

Select "Tab" for the Separator and click "Import".

For each new column added WebCT will ask what to do with it, select "Create New" from the pull down menu and click "Continue". Proceed to do this for each newly added column.

WebCT confirms columns in the imported file with those it will create in the Student Database, click "Continue".

For all new columns choose the column type, use the pull down menu and choose "Numeric", click "Continue" when done.

The column(s) have been successfully imported.

Return to Main Tutorial Menu