
![]()
![]()
![]()
![]()
![]()
![]()
![]()
![]()
![]()
![]()
![]()
![]()
![]()
![]()
![]()
![]()
How do I add a PowerPoint presentation to the Student Presentation area? (either scroll down through page or select from one of the following quick links)
About Student Presentations
Saving a PowerPoint Presentation
Uploading presentation to Student Presentations
![]()
> I am registered for a WebCT course, how do I log in?
> I have to email my instructor, how do I use Mail?
> My instructor is asking us to use Discussions, how do I do that?
> How do I add an attachment to Mail or Discussions?
> My instructor said we can forward WebCT mail to our hotmail/yahoo, etc., account, how do I do this?
> We have to do a class chat, how do I do that?
> How do I submit my homework using the Drop box or Assignments?
> How do I add a PowerPoint presentation to the Student Presentation area?
> I have to introduce myself in the Homepage area, how can I do this?
> I am doing my first quiz in WebCT, what should I know?
> Saving a PowerPoint presentation as a web page (for Windows)
> Saving a PowerPoint presentation as a web page (for Macintosh)
> How do I fill out a WebCT Problem Report so I can get some help?
> Is it a good idea to have more than I browser to use with WebCT? If so, how can I download more?
About Student Presentations:
Student Presentations is used most often by instructors as a way for either a single or group of students to upload a powerpoint presentation for peers to view. The basic process is to save your PowerPoint presentation as a web page with the name "index.html", then upload to your designated student presentation area. This saving/naming process is extremely important for the tool to function properly.
Saving your PowerPoint presentation:
Once you have completed working on your Powerpoint presentation, proceed to save it as a web page by clicking on the File menu, choosing "save as web page".
In the Save as screen, 1. make sure you are saving to the Desktop, 2. confirm that the file type is indeed a web Page and not some other format, 3. alter the title of the file to "index.html", 4. now click the "Publish" button for additional features.

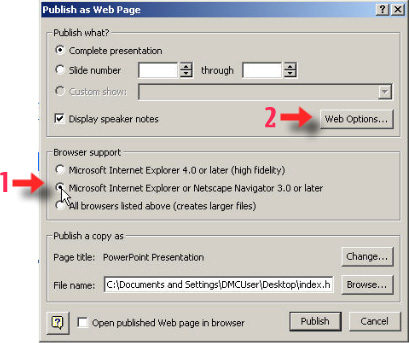
1. select the second option under Browser Support, 2. click on the "Web Options..." button.
Click on the "Files" tab.

Uncheck the option for "Organize supporting files in a folder" by clicking on the checkbox (this will delete the checkmark). Click "Ok" button when done.

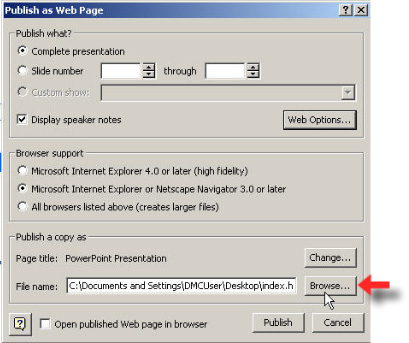
Click the "Browse" button.
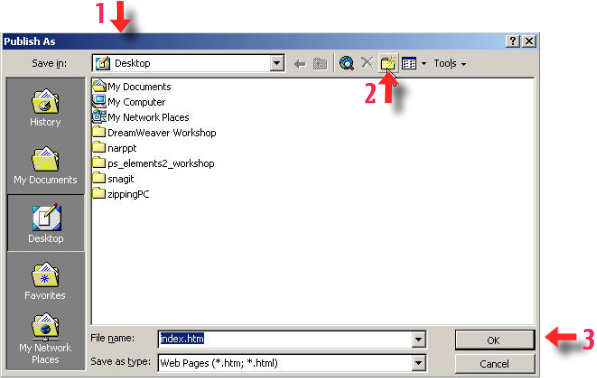
1. Confirm you are on the desktop, 2. click the "New folder" icon, enter a title (for example: "presentation"), click "ok" then 3. click OK once more.
Click "Publish".

The end result of this process is a folder on your desktop full of files. The files inside the folder need to be compressed into a zip file for uploading into Student presentations.
To zip the folder contents, enter the folder first, using your desktop menu go to "Edit", choose "Select all" so that all files are selected, now do a right click and choose "Send to" then pick "Archive". This will produce a single zipped file in your folder which should look similar to the following image:

Uploading the presentation:
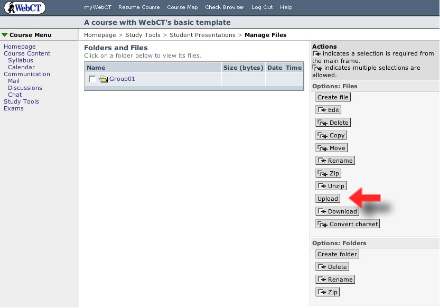
Return to your course Student Presentation area and click "Edit Files".

Over on the right click the "Upload" button.
Click the "Browse" button.

Now, click the "Upload" button.

1. Click the checkbox next to your uploaded file, 2. on the right click "Unzip" button.
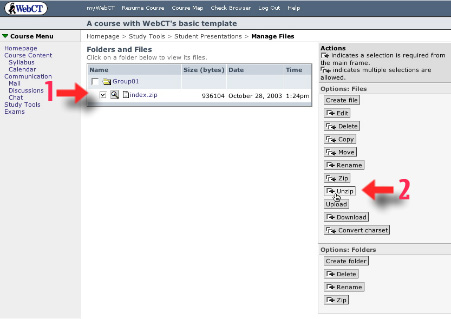
Click the "Unzip" button.

If successful you should be able to see the title of the presentation in the "Description" column in Student Presentations. This is what your peers would click on in order to view your PowerPoint.

Return to Main Tutorial Menu