
Blended course format is an instructional approach that combines face-to-face (F2F) and online Synchronous learning using video conferencing technologies.
Planning
- Pre-plan and organize your course material and make adjustments to your goals and classroom work to incorporate the technology.
- Allocate time for setup and allow for some technology hiccups.
- Go over netiquette with your students on the first day. Explain this class will function differently than a traditional course. Patience and understanding from both instructor and students are key to a successful experience.
- Explain to your students how you plan on using technology in your new classroom. Encourage online students to provide useful feedback if they feel they are not receiving class instruction adequately.
Engaging Students
- Engage with formal check-ins with all of your students. Especially online students.
- Ask pointed questions to your online students. "how was your day so far"? or "did you have any problems with yesterday's assignments?
- When you engage your online students it helps to make them feel included in the class and increases their overall attention.
- Periodically check back with your online students with follow up questions throughout your class period.
- Break up your students into groups that you rotate on a regular basis.
- Use Zoom's breakout rooms to create multiple groups that mixes your face to face and online students.
- Have face to face students use their smart phones to connect into the breakout room.
- If you have lab group work, use student phones to connect into breakout room and show in person lab experiments.
- Check in on your breakout rooms to see how groups are progressing.
- Adjust your expectations based on feedback from groupwork.
Utilize Zoom Tools
- Use some of Zoom's built in features like Polling, Breakout Rooms, Whiteboard and Content Sharing.
- Polling allows you to create single choice or multiple choice polling questions for your meetings.
- For more information about polling please visit our Polling tutorial.
- Another popular polling tool is Kahoot. Students as well as faculty love to interact using Kahoot.
- Breakout rooms allow you to split your Zoom meeting in up to 50 separate sessions.
- Have face to face students use their smart phones to connect into the breakout room with online students.
- For more information on breakout rooms please visit our Pre-assign Breakout Rooms and Managing Breakout Rooms tutorials.
- The Whiteboard feature will allow you to share a whiteboard that you and other participants (if allowed) can annotate on.
- For more information on whiteboard please visit our Whiteboard tutorial.
- Content sharing: Zoom allows you to share your entire desktop or phone screen, one or more specific applications, a portion of your screen, whiteboard, a locally stored video, device audio, content from a second camera, and, iPhone/iPad screen.
- As much as possible do not use the classroom's chalkboard(s) or whiteboard(s). Online students will have a hard time viewing written coursework on these boards. Use the room's Document camera or the Zoom screen share feature.
- If students are unable to clearly read written class content they will be easily discouraged from class.
- Use Laulima to post materials and links to resources. E.g Daily class agenda, notes, PPT slides, and syllabus.
- Require students to go online prior to each class to see daily class goals and objectives. Make sure your instructions are clear and explicit on assignments so no time is wasted in class managing questions or any confusion on assignments.
- Follow ITS-Zoom instructions on how to post class recordings so students can review classes online.
Orientation and Tutorial Videos


Zoom Classroom Instruction
See the technology list for a few Labs that are Zoom enabled with a camera for the instructor.
When breaking up into lab groups, our recommendation to engage your remote students is to utilize Zoom Breakout Rooms.
For example, if you have 4 lab groups, you will create 4 different breakout rooms. Designate an in-class student in each group to use their phone or tablet to connect to your Zoom meeting ID. Once all students have connected in, you can assign the students to the appropriate breakout rooms, allowing the in-class and remote students to collaborate on their lab work.
Please visit the University of Washington's Zoom Breakout Rooms tutorial for tips and more information.
- If using your own, or department provided, laptop ensure you are on the most recent version of Zoom.
- Download and install the latest Zoom application here
- ITS recommends using the Zoom application over connecting via a browser for better connectivity, performance and security.
- ITS recommends to go over "netiquette" with your students. Some topics to consider:
- Clarify your expectations for respectful and open-minded discussions.
- When not actively speaking students should keep their audio muted. This cuts down on distractions and background noise.
- To avoid interruptions, ask students to use the raise hand feature.
- If you are allowing students to use custom backgrounds, remind students they are only to use non-offensive and non-distracting pictures.
- For more information on netiquette please visit: https://docs.google.com/document/d/1ny9HksxP-t2D3tdWck-Ftx8XD8lmhMaqMWgxY7aAUkQ/
- If you are recording your classes, let your students know your classes are being recorded and the purpose for these recordings.
- Let students know how to access the class recordings. To ensure FERPA compliance, ITS recommends posting these recording links via your Laulima class portal.
- These recorded links are only for registered students of class and not to be shared outside of class. Please ensure students are made aware of this requirement.
If you require your classes to be recorded please go to https://www.hawaii.edu/its/videoconferencing/uhzoomrecording/ to request cloud recording access.Once cloud recording is enabled for your account, you will be able to provide your students with access to recorded classes for the semester. Cloud recorded classes will be available for access via the UH Zoom Recording Service within 24 to 48 hours.
- Start a meeting as the host.
- Click the Record button.

- Select Record to the Cloud to begin recording.
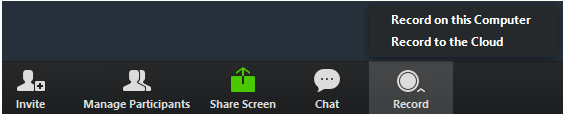
- To stop recording, click Pause/Stop Recording or End Meeting.

- Once the recording has been stopped, the recording must be processed before being available for viewing.
- Cloud recorded classes will be available for access via the UH Zoom Recording Service within 24 to 48 hours.
Automatic recording is an option that allows the host to start local recording or cloud recording automatically once the host (you) connects in.
- Sign into the Zoom web portal and click Meeting Settings
- Navigate to the Recording tab and verify that the Automatic Recording setting is enabled. If the setting is disabled, click the Status toggle to enable it. Note: If the Status toggle is grayed out, it has been locked uh-zoom-support@lists.hawaii.edu for assistance.

- Select Record in the cloud and click Save.
Note: If you have turned on automatic recording in your Meeting Settings, it will be set for any meetings that you schedule going forward. It will not apply to existing meetings or your Personal Meeting ID. You will need to enable it for these meetings individually.
Automatic recording is an option that allows the host to start local recording or cloud recording automatically once the host (you) connects in.
If you do not want to record all of your meetings you can leave automatic recording off and turn it on for individual meetings.
To control automatic recordings for a specific meeting:
- Go to My Meetings.
- Click on Schedule a Meeting or select the meeting topic from the list of Upcoming Meetings and click Edit this Meeting.
- Under Meeting Options, check Record the meeting automatically.
- Click Save.

- Once the recording has been stopped, the recording must be processed before being available for viewing.
- UH Cloud recording automatically provides closed captioning transcripts. Your recorded links will have captioning available.
- Cloud recorded classes will be available for access via the UH Zoom Recording Service within 24 to 48 hours.
- Double click on the Zoom Icon on the Desktop to open Zoom
- Log into your Zoom account.
- Once logged in you will be able to see your scheduled classes.
- Click to launch classes at the appropriate time.
- Plug in the HDMI from the projector as well as the USB that connects the room's camera, microphone, and speaker system to your laptop.
- If not already done so, download and install the latest Zoom application here
- ITS recommends using the Zoom application over connecting via a web browser for better connectivity, performance and security.
- Double click on the Zoom Icon on your Desktop to open Zoom
- Log into your Zoom account.
- Once logged in you will be able to see your scheduled classes.
- Click to launch classes at the appropriate time.
-
- ITS strongly recommends against connecting from a web browser. If you must, Chrome is preferred.
- To connect via Chrome:
- Navigate to https://hawaii.zoom.us/
- Select "Start a meeting" or class
- Login to your own Zoom account
- Launch and connect to your scheduled class with meeting ID and passcode.
- To connect via Chrome:
- ITS strongly recommends against connecting from a web browser. If you must, Chrome is preferred.
Audio and Video:
-
- Check to see that your audio and video have connected.
- If you are unsure, there is a "^" next to your Audio and Video menus located in the bottom left hand corner. If you click on these you are able to test your audio and microphone. As well as change an or your settings, for example turn up volume.
- If there is time, once your students are connected please check to make sure you can hear and see them as well as they can hear and see you. Your audio and video settings are in the lower left corner of the Zoom screen
- Check to see that your audio and video have connected.
Recording:
- If you have not scheduled your meeting or class to auto record, and want it recorded, press the record button, and select "Record to the Cloud" to begin recording.
Security:
- While not required, ITS recommends to disable students from changing their name upon connecting in. This feature is found under the "Security" menu by unchecking participants are allowed to "Rename Themselves".
- Other "Security" menu options available to you include allowing participants to use Chat or Share Content.
Sharing Content:
-
-
- By default only the meeting Host (you) can share content. Test sharing by clicking the green "share" button on the lower middle portion of your Zoom screen.
- Please DO NOT use the whiteboard in the classroom. Your remote students will not be able to view what you are writing.
- Please DO use the document camera on the side of the podium to display writing. You will need to provide your own paper to write on.
- Steps to sharing of document camera:

-
- If there is no document camera in the room you can use Zoom's built in whiteboard feature under "Sharing"
- Zoom whiteboard tutorial provided by UW https://history.washington.edu/tutorial-zoom-virtual-whiteboard
- To change your video layout use the screen layout menu in the top right hand corner of the Zoom screen. ITS recommends Gallery View as this allows you to see all your students at once.
- Please note, most screens max out at 25 students.
- Classes that are larger than 25 students would have multiple pages that you can toggle between to see your full class.
- If students are not muting their mic, remind them to do so. You can also mute students manually by selecting Manage Participants in the menu(see Fig below). You can mute individuals in the participant list or select Mute All at the bottom of the participant list.

- If unwanted student audio is an issue, you are able to disallow students from unmuting themselves. This feature is found under the "Security" menu (see Fig below) by unchecking "Unmute Themselves".

- You may want to ask students to submit their questions via chat or use the raise hand button so that you have an idea of who to call on during discussions. When students click the raise hand button you will see a notification pop up from the menu bar, a blue hand icon on their screen, as well as a blue hand icon next to their name in the Manage Participants window.
For more information about Here Or There (HOT) classrooms please visit https://www.cis.hawaii.edu/webcam-installations/
To schedule an orientation for your Here Or There (HOT) classroom please visit https://www.cis.hawaii.edu/here-or-there-hot-orientation-scheduling/
For training video and Zoom resources please visit our Zoom Tutorial website here or Zoom support website here
For online training, instructional tips and more resources for remote instruction during an emergency go to UHOIC
For UH Zoom support email uh-zoom-support@lists.hawaii.edu