
The University of Hawai’i uses electronic waitlisting so you can conveniently waitlist for a class that has already reached its maximum enrollment. Please know that being on a waitlist does not guarantee registration in a class. If you are next on the waitlist and a seat in the class becomes available, a notification is automatically sent to your UH email address (<UHusername>@hawaii.edu). You also have the option to forward the notification as a text message to your mobile phone. This feature is especially convenient for time-sensitive emails like waitlist notifications since there is a 24-hour window given to register for the class. If you do not register within that 24-hour window, the seat is no longer available to you and the next student on the list is notified of the open seat.
All 10 UH institutions offer waitlisting for most classes in both the fall and spring semesters; however, only select campuses offer waitlisting in the summer. It is your responsibility to check your email regularly and verify that your email address is correct. The waitlist feature ends the day before the semester officially begins. As of the first day of the semester through the late registration period, students may register directly into the class should a a seat become available.
*** WARNING ***Normal text messaging rules and carrier fees may apply. Students are solely responsible for these fees if they decide to use their text message service. The University of Hawai‘i is not responsible for the text messaging service and is therefore not liable in the unlikely event a carrier drops your message before it arrives on your mobile device. Due to its length, the registration notification message may arrive on your mobile phone truncated or as multiple text messages, so please consider this if you do not have an unlimited text messaging plan. |
Most phones that are capable of text‐messaging have an “email address” to which you can send a text message. The format of this email address is: 10digitphonenumber@service‐provider‐text‐messaging‐domain
10digitphonenumber = your mobile phone’s number including the area code
service‐provider‐text‐messaging‐domain = Each service provider has a different domain. For example, AT&T’s is txt.att.net. See domains below:
Here are the text messaging addresses for some of the common US wireless providers. It is, however, ultimately the student’s responsibility to ensure the correct address is entered, so you are encouraged to verify the address with your wireless provider. For wireless providers not listed below, please contact them directly.
-
- T‐Mobile <10digitphonenumber>@tmomail.net
- Verizon <10digitphonenumber>@vzwpix.com
- AT&T <10digitphonenumber>@txt.att.net
- MobiPCS <10digitphonenumber>@mobipcs.net
- Nextel <10digitphonenumber>@messaging.nextel.com
- Sprint <10digitphonenumber>@messaging.sprintpcs.com
So if you have an AT&T mobile phone and your mobile phone’s number is (808) 555‐1234, your text messaging email address would be 8085551234@txt.att.net
STEP 1: Add your mobile phone as a forwarding address
- Log in to your Google@UH mail account at http://gmail.hawaii.edu
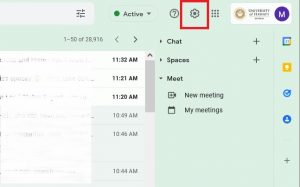
- Click on the Settings gear image (Step 1) and then select Settings from the drop down list.
- Click on Forwarding and POP/IMAP tab at the top.
- In the Forwarding section, click on the Add a forwarding address button.
- In the box, enter your 10digitphonenumber@service‐provider‐text‐messaging‐domain
For example, if your service provider is AT&T and your phone number is (808) 555‐1234, you would enter 8085551234@txt.att.net
- Click Next. A window will pop up displaying the forwarding address that was entered. Click Proceed.
- You will be told that you have added a new forwarding address. Click OK.
- Leave the “Disable forwarding” option selected When you are done, the screen should look like this:

STEP 2: Create a filter to text only your waitlist notifications
1. While still in Settings, click on the Filters and Blocked Addresses tab and then Create a new filter.

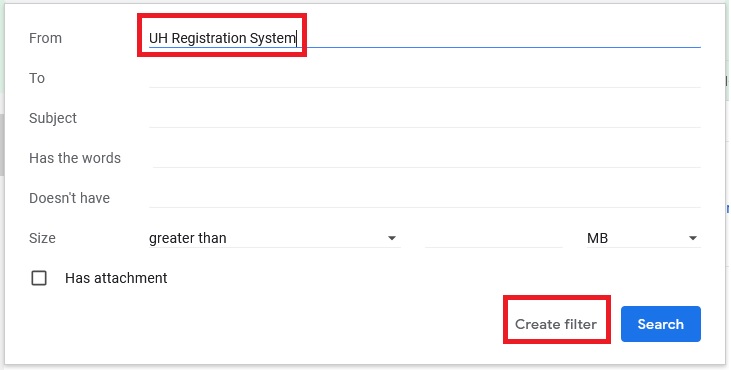
2. At the next screen, enter UH Registration System in the From: box as show below. Then click the Create filter link on the bottom right hand corner.
3. At the next screen, check the box next to Forward it to and select your phone’s email address from the drop down list. Below is an example of what the screen should look like:

4. Click on the Create Filter box.
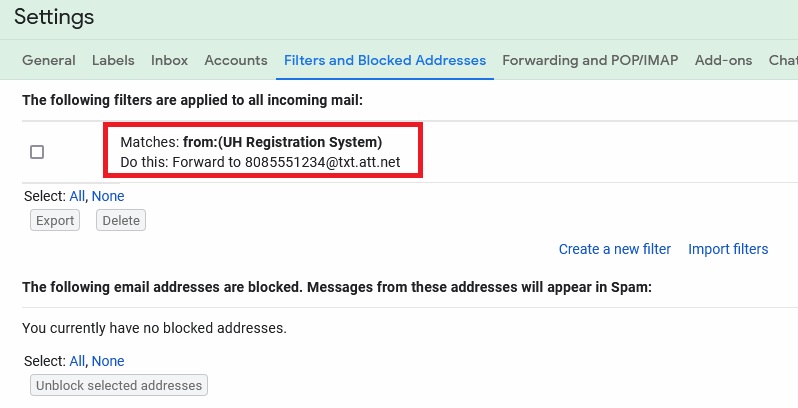
5. You will be told that your filter was created:
6. Click on Inbox in the left column to return to your mail.