- Enabled / Disabled Buttons
- Whether buttons are enabled or disabled is determined by your role and the document status.
 Buttons that display with white text are enabled, you may click on them to invoke that action. Buttons that display with white text are enabled, you may click on them to invoke that action.
 Buttons that display with dark turquoise text are disabled, you do not have the authority to invoke that action. Buttons that display with dark turquoise text are disabled, you do not have the authority to invoke that action.
- Help Links
 This image indicates help is available for a particular section. Click the image to display help text. This image indicates help is available for a particular section. Click the image to display help text.
- Inputting Dates and Times
- Dates and times may be inputted all numeric and the system will automatically reformat it with the appropriate characters.
Dates: Inputting 110504 automatically reformats to 11/05/2004
Times: Inputting 0600 automatically reformats to 6:00
- Messages
- Error messages display in red text, at the top of the page
and near the field that's causing the error. These are fatal errors and must be resolved for the user to proceed.
* indicates required fields.
Warning messages display in orange text, at the top of the
page or within a specific section. Warnings at the top of the page are persistent, i.e. will remain until
the condition no longer applies.
Success messages display in blue text at the top of the page.
 An orange flag is also a warning and will display next to a record or within a field where warnings exist. The
Help link within that section can explain the specific warning. An orange flag is also a warning and will display next to a record or within a field where warnings exist. The
Help link within that section can explain the specific warning.
- Printing
- Using File | Print - Printing from your browser using File | Print will print whatever page you are currently on, as is.
 This button is on the Travel Request, Travel Request + Advance, and Travel Completion and
allows you to print the document without the header image and without any text boxes so data is not hidden from view. This button is on the Travel Request, Travel Request + Advance, and Travel Completion and
allows you to print the document without the header image and without any text boxes so data is not hidden from view.
Printing with Shading - Travel data is displayed within shaded tables. To make the printed copy easier to read,
turn on "Print background colors and images" in your web browser settings. In Internet Explorer, click Tools,
Internet Options, Advanced. Check the box "Print background colors and images" as
shown below:

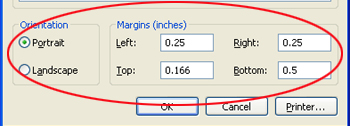
Adjusting Print Margins and Mode - If the text is cut off on your printed document, adjust your browser's print
margins or try printing in Landscape mode. In Internet Explorer, click File, Page Setup,
and adjust Margins and/or Orientation as shown below:
- Process / Flow
-
1/ After document Approved, must be printed, routed for required signatures, then sent to Disbursing.
2/ Void is only possible when status = Approved.
3/ Can only be created from an Approved Request or a Vouchered Request + Advance.
- Action Buttons
- Clicking an action button results in your document being re-calculated and/or saved.
1/ Is top down, clicking Calculate in the Itinerary section calculates the Expenditure
and Account sections. Clicking calculate in the Expenditure section calculates the
Account section.
2/ No edits or validations occur on Save but all data is written to the database to avoid losing any work.
3/ All final edits and validations occur on Approve.
|
Travel Request
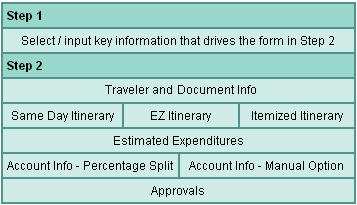
- Creating a Travel Request
- There are 2 Steps in the Travel Request - the sections are as follows.
Note: Multiple columns in one row indicate different options for the user.
- Estimated Expenditures
- A "Payment Method" may be specified when inputting expenses to note which have already been paid for
outside of eTravel, such as via Purchase Order, Purchasing Card, or Travel Card. This enables the system
to provide the total cost of the trip while handling reimbursement for expenses not yet paid for.
- Copy Feature
 Clickable at the bottom of all Travel Requests regardless of document
status. Creates a new document, i.e. a new Doc# is generated and the form is pre-filled with the same
data. All fields may be changed. Clickable at the bottom of all Travel Requests regardless of document
status. Creates a new document, i.e. a new Doc# is generated and the form is pre-filled with the same
data. All fields may be changed.
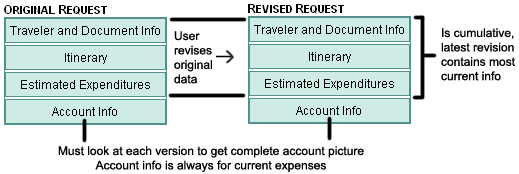
- Revise Feature
 Clickable at the bottom of a Travel Request document with status of
"Approved". Creates a new version of the existing document, so it retains the same Doc# but a revision number is
assigned. If multiple versions exist, only the most current one can be revised. Clickable at the bottom of a Travel Request document with status of
"Approved". Creates a new version of the existing document, so it retains the same Doc# but a revision number is
assigned. If multiple versions exist, only the most current one can be revised.
Revisions are typically for major changes to the itinerary or in the event the cost increases significantly
and approval must be obtained beforehand. Minor changes should be made at time of Completion. A revision is not
for transferring the travel document to another Traveler. On a revision, you cannot change the Traveler, Bargaining
Unit, or Business Office. Those changes require you use the Copy feature.
- Void Feature
 Clickable at the bottom of all APPROVED Travel Requests and Travel Request + Advance
documents. Voided documents will remain in the database but will not count as Outstanding so will not require a Completion.
Requests and Request + Advance documents that haven't reached the APPROVED status can simply be deleted from the system. Clickable at the bottom of all APPROVED Travel Requests and Travel Request + Advance
documents. Voided documents will remain in the database but will not count as Outstanding so will not require a Completion.
Requests and Request + Advance documents that haven't reached the APPROVED status can simply be deleted from the system.
|
Travel Request with Advance
Sections for the Request + Advance are similar to a Request without an Advance (see above) except the
Estimated Expenditure and Account sections contain additional columns for Advance information.
- Creating a Travel Request with an Advance
- In Step 1 in the Claim Travel Advance field, you must select "Yes" so Advance-related
fields display in Step 2.
Warnings will appear when:
-
• The minimum requirement of 10 days prior to the Departure Date is not met.
• Travel is Same Day, i.e. no overnight stay (requires an exception)
• Travel is Intra-State and is less than or equal to 4 days (requires an exception)
- Estimated Expenditures & Advance
-
Expenses an Advance may be taken for - Airfare, Per Diem, Lodging, Meals & Incidental Expenses (M&IE).
Expenses an Advance may not be taken for - Any expense for which the "Payment Method"
specified is pre-fixed with UH, which indicates the University already paid for the expense.
Note: Please check with your Department or Business Office as they may have their own internal restrictions
or guidelines.
- Finalizing the Advance Process
- 1. Print the Approved Travel Request + Advance.
2. Route for required Traveler and other Approving Authority signature.
3. Submit paper copies to the Disbursing Office (at least 10 business days before the trip).
- Copy Feature
- Clickable at the bottom of all Travel Request + Advance transactions, regardless
of document status. Creates a new document, i.e. a new Doc# is generated and the form is pre-filled with the same data.
All fields may be changed.
- Revise Feature
- Clickable at the bottom of a Travel Request + Advance document with
status of "Vouchered" or "Released". Creates a new version of the existing document, so it retains the same Doc# but a revision
number is assigned. If multiple versions exist, only the most current one can be revised.
Revisions must be to request additional money, i.e. another advance.
If no additional money is needed, all changes should be made at time of Completion.
A revision is not for transferring the travel document to another Traveler. On a revision,
you cannot change the Traveler, Bargaining Unit, or Business Office. Those changes require
you use the Copy feature.

- Void Feature
- Clickable at the bottom of all APPROVED Travel Requests and Travel Request + Advance
documents. Voided documents will remain in the database but will not count as Outstanding so will not require a Completion.
Requests and Request + Advance documents that haven't reached the APPROVED status can simply be deleted from the system.
|
Travel Completion
- Creating a Travel Completion
-
A Completion can only be generated from an "Approved" Request OR a "Released" Request with Advance. The user sees a list of Request documents and selects which one to generate a Completion for.
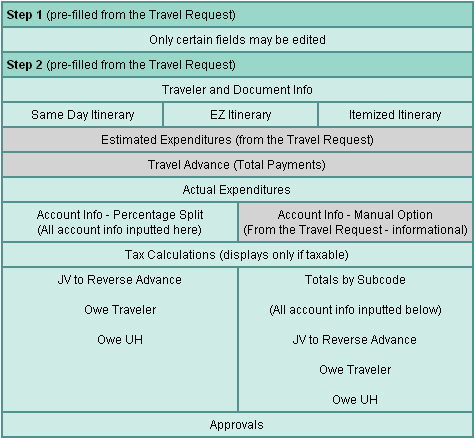
There are 2 Steps in the Travel Completion - the sections are as follows.
Multiple columns in one row indicate different options for the user.
Sections with gray shading indicate it's from the Travel Request and for informational purposes only.
- Outstanding Completions
- A Completion is considered "Outstanding" if an Approved Request or Released Request+Advance
is 7 days past the Return Date and an Approved or Released Completion does not exist. This
means a Completion with a status of InProcess is still considered Outstanding.
- Revise Feature
- Clickable at the bottom of a Completion document with status
of "Released". Creates a new version of the existing document, so it retains the same Doc# but
a revision number is assigned. If multiple versions exist, only the most current one can be revised.
Completion revisions are for minor changes so additional expenses may be added but the majority of the document cannot
be changed (such as the Traveler, Itinerary, etc.)

- Taxability
- If a trip is taxable, the appropriate information from your Travel Completion will be submitted by
Disburing directly to the Payroll office.
|


