

Virtual Server: How to install and configure backups (Bacula Enterprise) on a Windows Server
SUMMARY:
The Bacula backup service is the optional daily backup service listed in the ITS VMware Hosted Solutions page. Backups are FILE LEVEL only.
If you are a VM customer and have purchased this service, a client will need to be configured on your server to communicate with the backup server. This article describes installing and configuring the Bacula client on a Windows Server VM.
PREREQUISITES
Please be sure to change the DNS addresses on the public network interface to the following:
192.168.10.115
192.168.10.116
PART 1 - CONFIGURING THE BACKUP CLIENT
Install the Bacula Enterprise client by right-clicking the file and selecting “Run as Administrator”. You can get this file by emailing itscs@hawaii.edu.
Click Next at the below dialog box

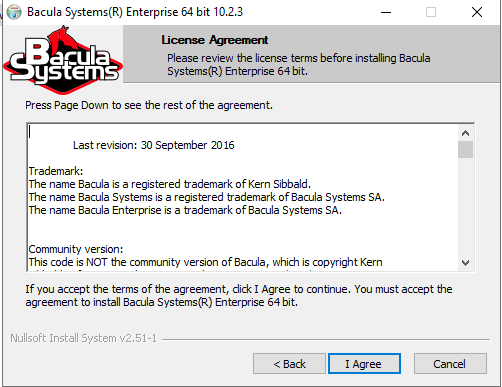
If you agree to the license agreement, click I Agree at the below dialog box.
Choose Custom at the below dialog box and then click Next.

When the dialog box below appears, select the items below and uncheck the others.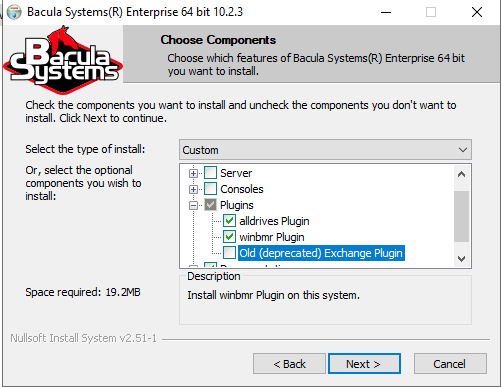
Client
Plugins
- Place a checkmark next to “alldrives Plugin”
- Place a checkmark next to “winbmr Plugin”
- Uncheck “Old (deprecated) Exchange Plugin”
Choose Default Install Location and then click Next

Click Next at this following screen after making sure the Name field matches your server name
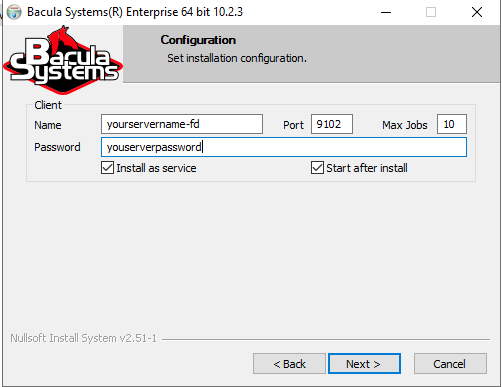
Enter the following value into the DIR Name field.
DIR Name: bacula-dir
click Install
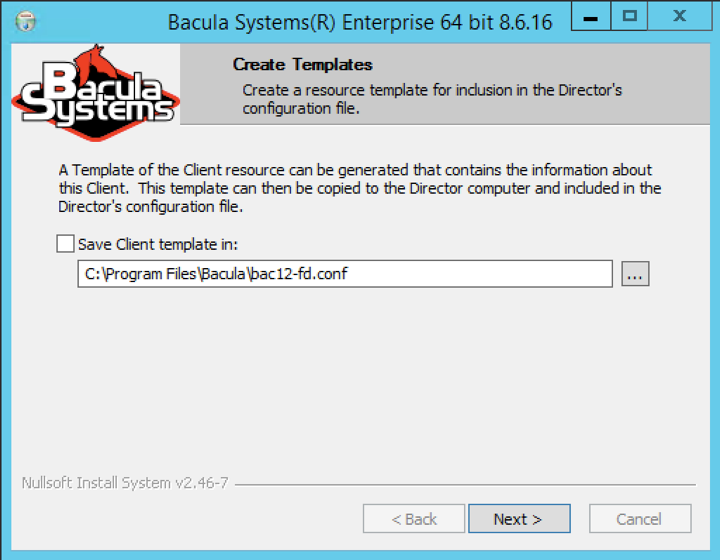
Leave the “Save Client template in” checkbox UNCHECKED and click Next
Click Finish at the below dialog box and read the Readme file
. 
PART 2 - EDITING THE WINDOWS FIREWALL
If your server is using WIndows Firewall, you will need to open ports to allow Bacula to communicate with the server.
- Open Firewall & Network Protection
- Select Advanced Settings
- Select Inbound Rules on the left pane
- On the right pane select New Rule
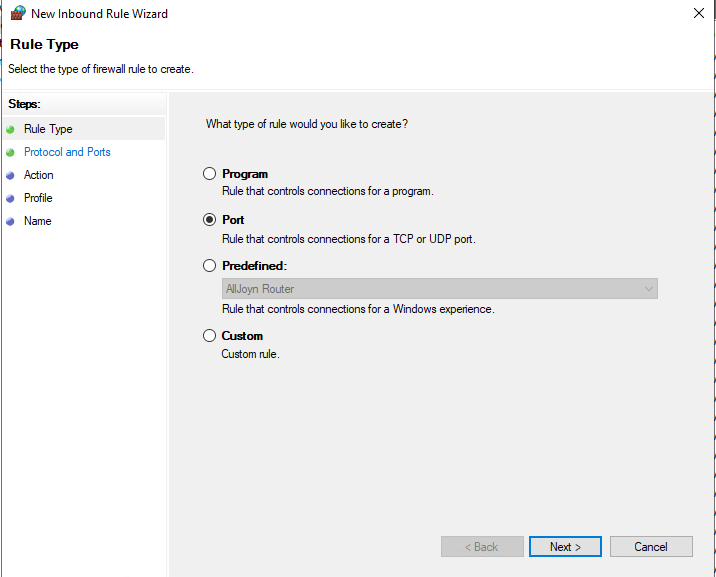
Select Port and then click Next
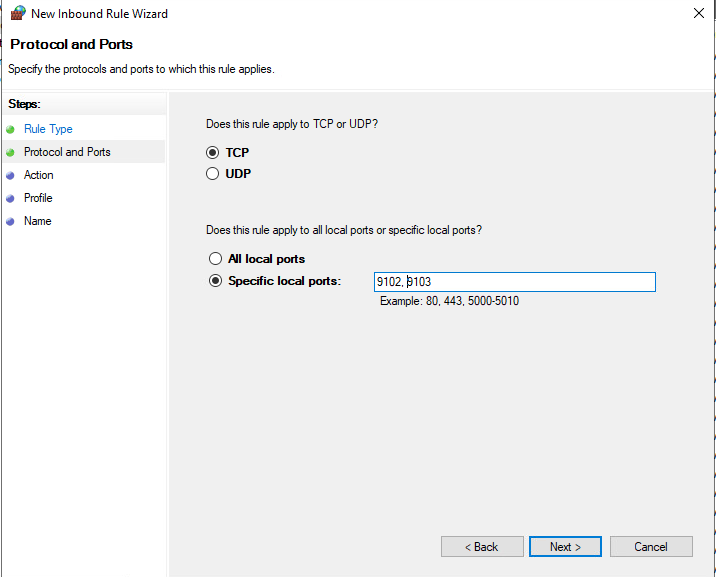
Make sure tcp is selected and specify the ports as 9102, 9103 then select Next
Select Allow the connection and then select Next

Check all boxes to apply the rule to all network types and select Next

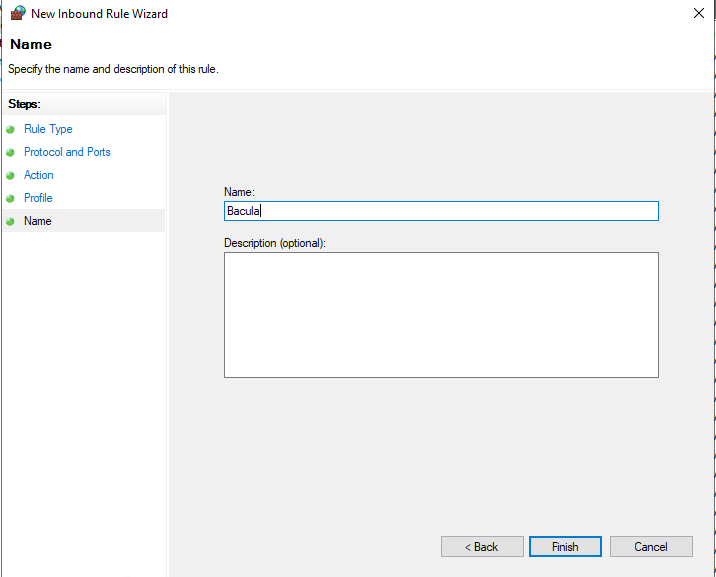
Name the rule Bacula and then select Finish
PART 3 - EDITING THE BACULA CONFIGURATION FILE
- Open Notepad as an Administrator (right-click it and go to "Run as Administrator). Open
C:\Programs Files\Bacula\bacula-fd.conf.
In the below section, remove the “-fd” from the shortname of the host (for example,hostname-fdtohostname). Also, changeMaximum Concurrent Jobsto20.
FileDaemon {                            # this is me

       Name = hostname

       FDport = 9102                # where we listen for the director

       WorkingDirectory = "C:\\Program Files\\Bacula\\working"

       Pid Directory = "C:\\Program Files\\Bacula\\working"

       Plugin Directory = "C:\\Program Files\\Bacula\\plugins"

       Maximum Concurrent Jobs = 20

    }
DELETE the below section:
#

     # Restricted Director, used by tray-monitor to get the

     #   status of the file daemon

     #

     Director {

       Name = hostname-mon

       Password ="some-password"

       Monitor = yes

     }
In the "some-password" field, copy this password and save it in a separate text file. You will need to file drop this to us so that it can be configured on our end.
#

    # List Directors who are permitted to contact this File daemon

    #

    Director {

       Name = bacula-dir

       Password = "some-password"        # Director must know this password

    }
- Save your changes to the
bacula-fd.conffile and close it. You may want to re-open it again just to ensure changed have been saved. - Go to Administrative Tools > Services and restart the Bacula File Backup Service. Search for Bacula File Backup Service right click, and select Restart.

The process should start with no errors. If you get an error or if the process hangs, review the previous steps to ensure Bacula was installed and configured correctly.
- The Bacula installation and setup process is now complete. Email itscs@hawaii.edu to let us know that the client has been configured. A staff member will respond and ask you to send the password (via UH Filedrop) that you saved earlier so we can start the backups.
RELATED ARTICLES:
Virtual Hosting: How to Submit a Restore Request
Virtual Server: File Level Backup Policy
Virtual Server: How to install and configure backups (Bacula) on a Red Hat Linux Server
