
UH VPN Setup - Macintosh
The following are instructions on how to connect to the UH VPN service by using the L2TP/IPsec VPN Client which is built-in to MacOS. Please choose the appropriate instructions for your version of macOS. To see which version of macOS is installed on your computer, please visit https://support.apple.com/en-us/HT201260.
Table of Contents
Instructions for macOS Ventura (13.0) and Above
Initial Configuration
-
Open the “System Settings” application on your computer.
-
Select the “Network” option from the side menu on the left. This will bring up the Network menu.
-
Click on the “...” button on the bottom right of the Network menu.
-
Select “Add VPN Configuration”, then “L2TP over IPSec…” from the dropdown menu.

-
The VPN configuration window will then appear.

-
Make the following changes in the VPN configuration window:
-
In the “Display Name” section, type “UH VPN” or any easily identifiable name. This is the name that will be used for the VPN connection.
-
In the “Configuration” section, make sure “Default” is selected from the dropdown.
-
In the “Server address” section, type “sevpn.its.hawaii.edu”.
-
In the “Account name” section, type in your UH username. For example, if your hawaii.edu address is help@hawaii.edu, then your UH Username is “help”.
-
In the “User Authentication” section, make sure “Password” is selected from the dropdown.
-
The “Password” section can be left blank.
-
In the “Machine Authentication” section, make sure “Shared Secret” is selected from the dropdown.
-
In the “Shared Secret” section, type in the shared secret. If you don’t know the shared secret, you can obtain it at https://www.hawaii.edu/its/vpn. (Note: You may need to scroll down to see this option).
-
Open the “Options” section from the menu on the left and toggle the “Send all traffic over VPN connection” switch to the “on” position by clicking the switch.

-
-
Once the changes specified above have been made, click on the “Create” button. This will create a new “VPN” section in the “Network” menu. The VPN section will also appear in the side menu on the left.

Starting A VPN Connection
-
Open the “System Settings” application on your computer.
-
Select the “VPN” option from the side menu on the left. This will bring up the VPN menu.

-
Toggle the switch next to your VPN connection to the “on” position by clicking the switch.
-
You will then be prompted for your username and password.
-
In the “Please enter your name” section, make sure your UH username is entered correctly.
-
In the “please enter your password” section, enter your UH password.
-
Once the above information has been entered, press “OK”.

-
-
Once connected to the UH VPN, the text under the name of your VPN will display “Connected”.

-
To disconnect from the UH VPN, toggle the switch next to the VPN connection to the “off” position by clicking on the switch.
-
Adding the VPN Status Icon to the Menu Bar
In macOS, you have the option of adding a VPN icon to the menu bar which allows you to manage your VPN connections without opening the System Settings application. You can find instructions on how to add the VPN status icon to your menu bar at https://support.apple.com/guide/mac-help/vpn-status-icon-menu-bar-mac-mchl7f06ab80/mac.
Instructions for macOS Monterey (12.0) and Below
Video Tutorial
Initial Configuration (one time only)
- Near the top right of the screen (to the left of the time), click on the Network (WiFi) icon. From the menu that drops down, select Open Network Preferences...

- The Network system preference window will open. Click on the + (plus) button near the lower left of the window.
- Under the "Interface" option, select VPN. Under the "VPN Type" option, select L2TP over IPsec. In the "Service Name" box, type UH VPN. Click on the Create button.
.jpg)
- A new L2TP VPN configuration will be created, and its configuration screen will appear.
In the "Server Address" box, type sevpn.its.hawaii.edu
In the "Account Name" box, type your UH Username. For example, if your hawaii.edu address is help@hawaii.edu, then your UH Username is "help".
Check the box for "Show VPN status in menu bar"

- Click on the Authentication Settings... button.
Under the "User Authentication" section, make sure "Password" is selected. Do not type anything in the box next to "Password".
Under the "Machine Authentication" section, make sure "Shared Secret" is selected. In the box next to "Shared Secret" type the shared secret.
(If you don't know the shared secret, you can obtain it at https://www.hawaii.edu/its/vpn)
Click on OK
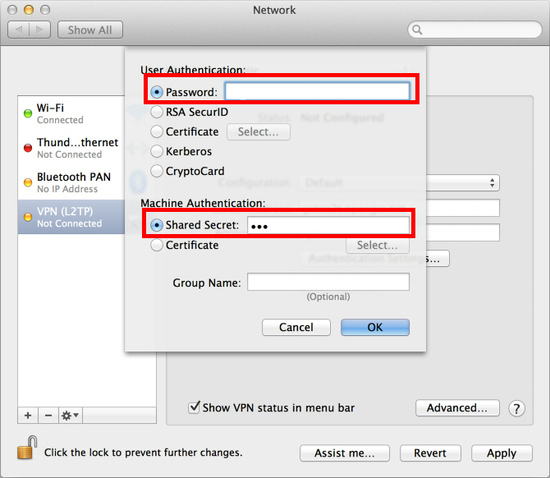
- You will be back at the VPN configuration screen. Click on the Advanced... button.
Check the box for "Send all traffic over VPN connection"
Click on OK
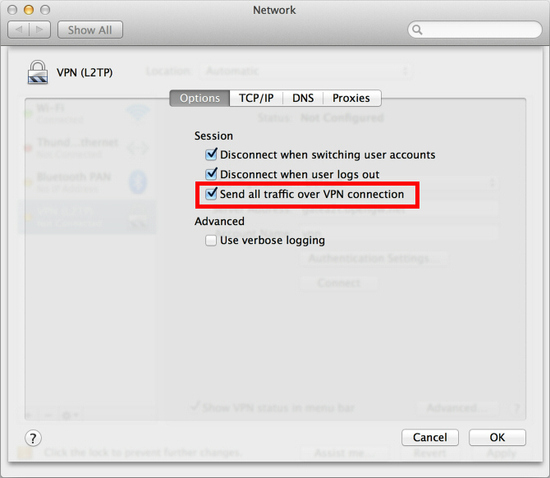
- In the lower right corner of the window, click on Apply.
- Close the VPN configuration screen by clicking on the red dot in the upper left corner of the window.
Start a VPN Connection
- Go to the VPN icon (
.jpg) ) in the upper right of the screen, to the left of the time. From the menu that drops down, select Connect UH VPN.

- Enter your UH Username's password, and click OK.
- If you connected successfully, you should see a timer counting next to the VPN icon.

- To disconnect from the UH VPN, go to the VPN icon and select Disconnect UH VPN.
Additional Resources
For more information about the UH VPN service please visit https://www.hawaii.edu/askus/819. If you have any questions about the UH VPN or need additional assistance, please email vpn-help@lists.hawaii.edu.